1995 Defender 90 Station Wagon
Galvanized frame and Refurbishing

This Defender 90 Station Wagon is a vehicle that ECR sold some time ago. We made some minor upgrades to it so the owner could play around with it, but the broad strokes of the plan were always to bring it back, gut everything and turn it into a Defender 90 that would last long term and be reliable. So to that end we will be installing a new galvanized chassis, a complete repaint and a corrosion resistant assembly from the ground up. The starting point is this clean low miles D90 that you see above.

The next step... tear it apart down to the smallest piece to either galvanize, repaint, or treat every piece. The beginnings of which you see above.

After we have stripped the entire body off the D90 it is time to work on stopping the corrosion that is common on a Defender. In the image above you will see the door from the D90. All its parts have been removed and it is now being dunked in heavy duty rust resistant primer. The "dunking" action will allow the primer to flow into all the small areas so that door frame rust and corrosion will not occur.

Once completed the door looks disgusting, but that is the point., for this ultra tough primer to flow into every place that our pray gun won't be able to get to. The excess will be cleaned up and the show surfaces will be prep=d for a a top quality paint job with 3 coats of epoxy primer and 3-4 coats of PPG top coat in the original Coniston Green.
To keep this same level of preparation going we even removed the hood's steel frame work, painted it inside and out and then reassembled the hood and primed and top coasted it so rust will not be a factor.

To combat corrosion in the rear body tub we have removed the steel lower supports for the safari cage and the tub floor. These pieces will now be blasted and hot dip galvanized (like a boat trailer) so that rust will not be have a shot at taking hold. The cap rails on the 90 have been blasted, triple epoxy primed and then top coasted in 4 coats of green. Each piece has been painted individually so that full paint coverage is applied to the front and back. The pieces are then assembled back into what looks like a stock body tub. The image above shows the D90's rear body getting ready for installation. The tail lights are assembled onto the freshly painted panels with all stainless steel hardware that is isolated from the alloy by Teflon washers so that galvanic corrosion is not possible. Even the screws used to hold the tail lights to the tail light plinths are stainless steel.

To make sure that frame rust will not happen we will be installing an ECR hybrid galvanized chassis. These chassis are our own creation. They are modified new factory frames that we buy off the Rover assembly line. We then ship them in and make the needed changes to make them both NAS (North American Specification) and Tdi specification. This allows us to remain the rear plastic fuel tank, but has all the needed mounts for the Tdi engine, exhaust etc. The chassis also can be pre-modified to accept our ECR ROX sliders with all those mounts galvanized in. In this customer's case we will be adding the ECR ROX sliders, so the mounts are already fabricated and galvanized in. The image above shows one of our transport trucks returning with 2 ECR D90 frames, fresh from the galvanizers. One of these chassis will be used for this D90 project.

As each piece is primed and painted it is safely stored away until we begin to assemble the body on the new frame.

In the image above you can see the level of prep. that goes into making a Defender 90 have no rust. You'll notice that the seat box has been fully primed and painted, but that isn't all. The seat box lockers were painted separately and then isolated from the alloy seat box with isolation compound so that no corrosion between the alloy and the seat locker will take place.Once everything is assembled with stainless hardware on a galvanized frame this D90 should be a near lifetime vehicle.

Here you can see we have started to set up the new ECR chassis with the axles and suspension. Each suspension piece was blasted and then epoxy primed and painted. New bushings were installed and every bolt is coated with lubricant to ensure easy service even long term.

In the image above you can see what we mean when we say "long term". Everything on this D90 that can rust out is being treated in some way. Here you can see that the shock towers, spring plates and anything else that could be, has been galvanized for long life. We also installed new springs for the customer's ride taste and added a set of Bilstien shocks to help smooth out the bumps. All the hardware that can be stainless steel is, stainless steel, also for long life and easy future services.

This image shows the new rolling chassis nearly complete.


Above you can see that we have installed the ECR ROX stainless steel brake and clutch pipes. Our lines have stainless tubes, and stainless fittings so that this D90 will never need a brake pipe replaced, ever. These lines follow the factory routes exactly and are CNC made for a perfect fit.

The stainless parts for longevity sake continue in the fuel system of the D90. Here you can see the ECR ROX stainless steel fuel lines connected to the modified EFI fuel pump. These stainless lines have all new rubber hoses for long life and we have built them. They follow the factory routes exactly, but they won't rust out.

Here you can see that the rolling chassis is complete and the bulkhead has been installed. The brakes and clutch hydraulics have been installed and bled. Next we will begin to install the wiring and control systems.

In this image you can see that the body is starting to go back together. The rear tub, with its new paint and galvanized tub supports is loosely in place and being lined up so that door gaps, body lines and such are all correct. You can also see that the new Good-Year MTR tires have been installed, as well as the rear step bumper and the galvanized fuel tank skid plate.

Now that the body lines have been adjusted and set (a step Land Rover itself never took (that is why your D90 leaks and this one won't)) the rest of the panels can start to be installed. The epoxy primed and painted seat box has now been installed with all stainless hardware, and where water is likely to sit, each stainless bolt is isolated from the body with a Teflon washer for no corrosion in the future.
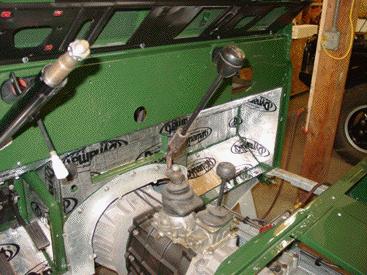
In the bulkhead or firewall area the now galvanized gearbox adaptor plate has been installed and we have started to outfit the 90 with sound reduction material. This will keep the D90 sounding solid, as well as reduce some road and engine noise from the diesel. All these areas will be hidden with carpet trims and Hardura that will give a clean factory look, but will offer a much better experience inside the Defender because of the reduced cabin noise.

Outside the Defender is starting to take shape. The body lines and door gaps have all been set so that the doors will close easily and there will be no water gaps. The upper and lower roll cage bars have been installed and the dash and wiring is starting to go into place.

As the wiring and the systems go into place, modifications are made to make the Defender a better vehicle. The image above shows the opening in the bulkhead that allows hot air from the heater (mounted in the engine bay) to enter the heater ducts. Land Rover left the opening for the heater about half the size it should have been for full air flow because of their LHD/ RHD design of some of these parts. The purple line shows the difference. To the left of the line is what the factory opening looked like. To the right of the line is the extent that we have been able to open up the area, nearly doubling it, so that we have increased air flow for heat and defrost inside the vehicle. Think your local Rover shop knows and does all this??? and just think about all the tricks we do to make Defenders better that we keep to ourselves.

As the wiring continues and the engine systems are connected, the body continues to be put together. Each body seal is replaced with new and every gap is made as perfect as possible. This reduced water and air leaks and makes for a better driving experience. New carpets are installed and updated ECR seat bases, ones that do not rock back and forth, are installed.

Here you can see that the rear body is nearly complete. The freshly painted Alpine White roof has been installed with new roof gaskets and window seals. We have also installed a new heated windscreen in the 90 (the windscreen has a small electrical wire running through it to melt ice and deduce fogging). This will give the owner a nice clear view, even on the worst days.

In the rear we have put down the layers of sound deadening material, and installed the new carpets for a fresh look to the 1995 Defender. We have also finalized the roll cage brackets and installed the seat belt mounts as well.

In the front of the 90 we have started to wire up and install the interior. In this D90 each fastener is stainless steel so that future service can be handled without any seized hardware. Each wiring connection is coated with dielectric grease on the contact side, and then sprayed with protectant on the other side to combat any bad connections that could cause electrical issues in the future. The wiring looks like spaghetti at this stage, but with a Defender this far apart, everything can be double checked and hand assembled with care so that no issues will come up down the road. No electrical gremlins, no broken wires, no bad connections, not in an ECR D90.

To upgrade the factory radio we have installed Alpine's newest head unit. This head unit has all the goodies from XM radio controls to CD and MP3 and we also added Alpine's new iPod controller. The iPod controller is hidden under the cubby box for a clean looking install.

The connection for the iPod leads into the cubby box. We fabricated an alloy bracket with a foam pad to safely and securely hold the iPod while it is docked to the Defender. The bracket will also keep the iPod from getting lost in the depths of the gear that usually ends up inside cubby boxes over time. Once connected, all the iPod controls and functions are now available directly through the Alpine head unit for access to thousands of song titles, right through your Rover's radio.

Now that the head unit has been upgraded we turn to the speakers. The factory paper cone speakers are a joke. We have replaced them with a set of 4 Alpine speakers for better sound to all the songs the iPod will hold. Here you can see one of the Alpine speakers going into the rear of the D90.

To keep a nice factory look we have adapted the factory speaker covers to work with the new Alpine speakers. This gives clean and finished look to the audio system for an upgraded, yet tasteful appearance.

Here you can see that as the systems are finished up, the body work starts to come together. The L and R front fenders have been loosely installed and all the wiring hooked up and tested. Now we will wire up the Warn winch and connect it to the twin batteries. We also added a Defender 110 battery cut off switch inside the 90 for ease of disconnecting the batteries if the 90 isn't being driven.

Now that the main system on the Rover are coming together we can turn our attention to some of the customer's desired upgrades. Above you can see that we have fabricated a pair of ECR ROX sliders with Hi-Lift points that will be used on the Rover to protect it from harm. These will now be media blasted and them primed and painted in the body color.

To make the ECR ROX sliders so strong we actually alter the Rover, not just bolt on a slider. In the image above you can see that we have added a plate to the frame for slider strength. We did this before the frame was galvanized so that rust will not be a factor. This makes the ECR ROX sliders on this 90 tough, long lasting and good looking. You can also see in this photo the extent of our galvanizing on this 90. Every mount,m every bracket has been galvanized for long life and ease of service in the future.

The extent of the rust proofing on this Defender is continued in the exhaust system. We have installed an ECR ROX full stainless exhaust system that is specially designed to work with all the NAS mounts on the chassis, but mates directly to the head pipe. This means an exhaust system that will not suffer from rust in the future.


Back inside the D90 we have powered up the electrical system, powered by a high amp alternator and twin Optima batteries and are testing the systems. Above you can see we are testing the Alpine system with its iPod interface while the iPod stays safely and securely inside the cubby box, but it is easily removed when you exit the Rover.

Here you can see that we have started to trim out the interior of the 90. New front and rear headliners have been installed and all the body seals have been checked and installed with better techniques then the factory used so that this D90 will actually be leak free.

This image shows the ECR ROX sliders just after epoxy painting in our spray booth. The body color units will be a great looking, and functional addition to the Defender.

Here you can see that things are progressing in the interior. The sunroof and trim have been installed as well as the interior lights and the sun visors. The door seals have been added and except for a few details the upper section of the interior is nearly completed.

The rear interior area is also nearly complete. The rear jump seats have been reinstalled and covered with weather resistant seat covers for a a long seat life.

Here you can see the ECR ROX sliders in place. The customer also had us add bolt on/off side steps for the times when he is not off roading. The sliders blend in nicely on the side of the 90 and will offer bulletproof protection for any off roading the owner gets into.

Now that the doors and hood have been installed it is time to start testing everything. Every bulb, every lock, every switch is double checked for correct and smooth operation before the 90 will go through a final clean up to be made ready for the owner. This lifetime D90 is now nearly complete and almost ready for road tests.

Inside the Defender 90 we have finished up all the custom work and finalized the interior. The benefits to an ECR built Defender are less road noise, no rattles and no shakes, and this Defender will also last a long time. You can see above we have installed all the trims and a heavy duty floor mat for the cargo area.

To control the new heated windscreen we installed we used one of ECR's switches with the correct logo and placement in the wiper motor cover. There are no goofy aftermarket switches here, even with this add on it all looks factory installed.

When all that attention to detail comes together it ends up looking like what you see above. A fully corrosion resistant, North American Specification Defender 90. Originally built in 1995, but fully remanufactured by ECR in 2004. The Defender is now ready to be delivered to its owner where it will serve him well, without faults, without costly dealer servicing and without fail for many years to come.
If you have a Defender and you need anything from a full upgrade and remanufacture, to a simple repair, contact ECR. We'll be happy to help make your Defender world class.... just like this one!
For a photo gallery of the completed D90 go here.